Introduction
How to Deploy or Host a Node.js/Next.js App on CloudPanel: Complete Guide
CloudPanel is a free, lightweight server control panel that makes it easy to host Node.js and Next.js apps on your own VPS — including DigitalOcean droplets. This guide walks through the full process: server setup, deployment, process management with PM2, SSL, and the real troubleshooting issues you’re likely to hit along the way.
Prerequisites
- A VPS/droplet (Ubuntu 22.04 or 24.04, minimum 2GB RAM)
- Root or sudo SSH access
- A domain name with access to DNS settings
- Your Next.js/Node.js app in a Git repository or as local files
Step 1: Point Your Domain to the Server
Add an A record in your domain’s DNS settings pointing to your server’s IP address. DNS propagation can take anywhere from a few minutes to a few hours, so handle this first.
Step 2: Create a Node.js Site in CloudPanel
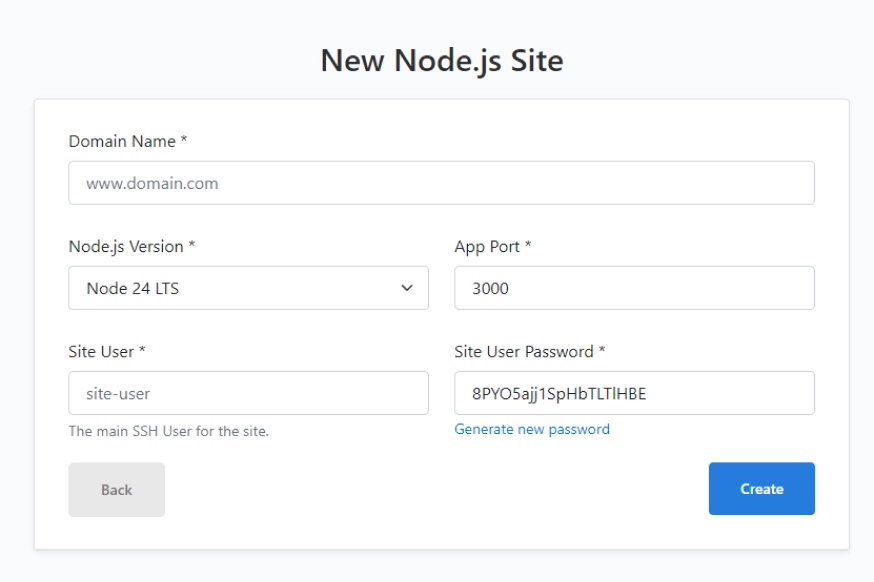
- Go to Sites → Add Site → Create a Node.js Site.
- Fill in:
- Domain name – your app’s domain/subdomain
- Node.js version – choose the latest LTS available
- App port – e.g.
3000(CloudPanel’s Nginx reverse proxy forwards public traffic to this port) - Site user – a dedicated system user CloudPanel creates for isolation
Step 4: Upload or Clone Your App
Always work as the site user, never as root — this matters more than it sounds like, and we’ll get to exactly why below.
ssh deployuser@your_server_ip
cd ~/htdocs/yourdomain.com
git clone https://github.com/yourusername/your-nextjs-app.git .
Step 5: Install Dependencies and Build
npm install
npm run build
Make sure package.json has a working start script for your setup — standalone output mode (recommended for production) looks like:
"scripts": {
  "start": "node .next/standalone/server.js"
}
Step 6: Set Environment Variables
Create a .env (or .env.production) file in your app root for API keys, database URLs, etc. Never commit secrets to your repo.
Step 7: Run the App with PM2
Create a .env (or .env.production) file in your app root for API keys, database URLs, etc. Never commit secrets to your repo.
npm install -g pm2The cleanest way to start a standalone Next.js build is to cd into the standalone folder first, so PM2’s working directory and script path don’t conflict:
cd .next/standalone
pm2 start server.js --name server --env production
pm2 save
pm2 startup
Run the command pm2 startup prints out (usually with sudo) to register PM2 as a system service so your app survives reboots.
Useful commands:
pm2 list
pm2 logs server
pm2 restart server
pm2 stop server
Step 8: Enable SSL (Let's Encrypt)
In CloudPanel: go to your site → SSL/TLS → New Let’s Encrypt Certificate, select your domain (and www if needed), and issue. CloudPanel handles renewal automatically.
Step 9: Test Your Deployment
Visit https://yourdomain.com. If it doesn’t load, check pm2 logs server, confirm the app port matches CloudPanel’s site settings, and check the site’s Nginx logs in CloudPanel’s Logs section.
How do I install Node.js on a CloudPanel server?
You don't install Node.js manually with apt or NodeSource on CloudPanel. Instead, go to Sites → Add Site → Create a Node.js Site in the CloudPanel dashboard and select a Node.js version from the dropdown during site creation. CloudPanel provisions that version for the site automatically. To change the version later, go to Sites → your site → Node.js tab and select a different version, then reconnect your SSH session for the change to apply.
How do I install a Next.js app on CloudPanel?
Create a Node.js site in CloudPanel first (Sites → Add Site → Create a Node.js Site), set an app port such as 3000, and select your Node.js version. Then SSH in as the site user, cd into ~/htdocs/yourdomain.com, clone or upload your Next.js app, run npm install followed by npm run build, and start the app with PM2 using pm2 start server.js --name server from inside .next/standalone (if using standalone output) or pm2 start npm --name server -- start otherwise.
How do I check which Node.js version is active on my CloudPanel site?
Run node -v while logged in as the site user (not root). SSH in with ssh siteuser@your_server_ip, or switch users with su - siteuser, then run node -v. If the version shown doesn't match what's set in CloudPanel's dashboard, disconnect fully and reconnect via SSH rather than just switching users mid-session.
Why does node -v show a different version than what I set in CloudPanel?
This almost always means you're checking the version as root instead of the site user. CloudPanel applies its per-site Node.js version setting only to that site's dedicated system user, not to root's shell, which typically runs an older OS-level Node install (often 18.x on Ubuntu). Always run su - siteuser or SSH in directly as the site user before checking or building.
Does CloudPanel use nvm to manage Node.js versions?
No. CloudPanel does not rely on nvm (Node Version Manager). It installs and manages Node.js versions internally and assigns a version per site through its own dashboard control. If nvm isn't found on your server, that's expected behavior, not a misconfiguration — you don't need to install it.
How do I install PM2 on CloudPanel and run a Node.js app with it?
Install PM2 globally as your site user with npm install -g pm2. Start your app with pm2 start server.js --name server --env production (run this from inside .next/standalone for a Next.js standalone build, or use pm2 start npm -- start for a standard build). Then run pm2 save to persist the process list and pm2 startup to generate a command that registers PM2 to auto-start on server reboot.
How do I install and configure SSL for a Node.js app on CloudPanel?
In the CloudPanel dashboard, open your site and go to SSL/TLS → New Let's Encrypt Certificate. Select the domain (and any subdomains like www) and issue the certificate. CloudPanel uses Let's Encrypt and renews certificates automatically — no manual installation or cron job is required.
How do I fix "Node.js version required" errors during npm install on CloudPanel?
This error means the active Node.js version in your current shell session is below what the package (commonly Next.js) requires. Fix it by setting the correct version for your site in CloudPanel's dashboard under Sites → your site → Node.js tab, then reconnecting via SSH as the site user (not root) and re-running node -v to confirm before retrying npm install.
Can I install Node.js apps on CloudPanel without root access?
Yes, for day-to-day deployment. CloudPanel creates a dedicated, non-root site user for each Node.js site with permissions scoped to that site's directory. You use this site user for cloning code, installing dependencies, building, and running PM2. Root access is only needed once, during the initial CloudPanel installation and site creation.
Why does npm install or npm run build fail with a Windows-style syntax error on CloudPanel?
This happens when a project's package.json scripts were written using Windows commands (xcopy, if exist, rmdir /s /q, PowerShell) and are executed through a Linux shell, which doesn't recognize that syntax. The fix is to use or create a Linux-compatible build script (e.g., a build-linux.sh file run via bash build-linux.sh) with POSIX-compliant commands like rm -rf, cp -r, and mkdir -p.
Why is my standalone Next.js build missing CSS or images after deployment on CloudPanel?
Next.js standalone output mode does not automatically copy the public/ folder or .next/static/ directory into the standalone build. After every next build, copy them manually: cp -r public .next/standalone/ and cp -r .next/static .next/standalone/.next/. Automate this in your build script so it isn't missed on future deployments.
How do I restart a Node.js app after updating code on CloudPanel?
Pull or upload the updated code, run npm install and npm run build again as the site user, then restart the PM2 process with pm2 restart server (using whatever name you assigned with --name when starting it). This applies the new build without needing to stop and manually restart the entire process from scratch.